Website Upgrade Incoming - we're working on a new look (and speed!) standby while we finalise the project

Tips on using this forum..

(1) Explain your problem, don't simply post "This isn't working". What were you doing when you faced the problem? What have you tried to resolve - did you look for a solution using "Search" ? Has it happened just once or several times?

(2) It's also good to get feedback when a solution is found, return to the original post to explain how it was resolved so that more people can also use the results.

Tracking Predecessors and Successors in complex MSP Schedule

6 replies [Last post]
UK Planning Engineer
User offline. Last seen 3 years 9 weeks ago. Offline
Joined: 19 Jul 2012
Posts: 15
Groups: None

I'm in the process of creating a Schedule which is increasingly becoming more complex with more tasks and scope being added daily, noting P6's "Go To" function allowing you to trace up and down paths of successors and predecessor paths, is there a similar function in MSP that allows to track a number of paths and predecessors and successors (outside of Activity Path function)nwhen there may be several dozen and numerous paths in and out of an activity to different parts of scope?


I know the Ctrl + G function to allow to go to different IDs but this detracts from the original activity that I'm concerned with, is there an alternative?


Also, in having a finish date for a milestone confirmed but not the work before this, can you set a Finish no later than or similar constraint on a milestone and set all predecessor activities to "as late as possible" to schedule back from that date? As I've heard "Schedule from project end" can create issues?


Thanks again,
Replies

Rodel Marasigan
User offline. Last seen 4 days 10 hours ago. Offline
Joined: 25 Oct 2006
Posts: 1699

I write a simple VBA code to mimic the Primavera (P6) Relationship GoTo function. It allows the user to trace up and down paths of successors and predecessors. The Add-In function will automatically add to the Add-In menu in MS Project.

Please follow below steps to install in your MS Project Global.MPT

  1. On MS Project ribbon menu, click DEVELOPER ribbon or alternatively press “Alt F11”. A Visual Basic window will open
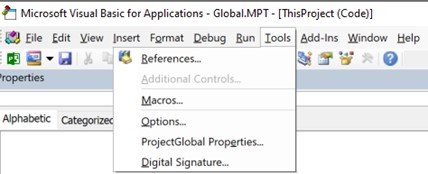
  2. On Visual Basic menu select Tools then click References

VBA-Code-menu

3. A References window will open and tick Microsoft Forms 2.0 Object Library (FM20.DLL) then click OK.

Reference-Window

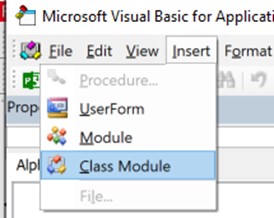
4. On Visual Basic menu select Insert then click Class Module

Visual-Class-Menu

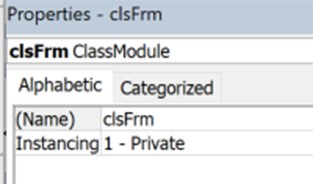
5. On Class Module properties change the name to “clsFrm”. see below

Class-Form-Properties

6. Once done select the clsFrm module and double click.

Class-Module

7. A blank VBA sheet will show.  Copy and Paste below VBA Code

'Start copy from line below

Option Explicit


'!!!!!!!!!!!!!!!!!!!!!!!!!!!!!!!!!!!!!!!!!!!!!!!!!!!!!!!!!!!!!!!!!!!!!!!!!!!!!!!!!!!!!!!!!!!!!!!!!!!

'This VBA code is written by Rodel Marasigan, 05Oct2021

'The purpose of this Class Module is to mimic the Relationship Tab in Primavera P6

'for the user to have a GoTo function to each Predecessors or Successor of Task selected

'By Double Clicking the selected Task in the Relationship Form, it automatically GoTo Task selected

'This VBA code requires to Enable the following references or equivalent (Tools > References)

    'Microsoft Forms 2.0 Object Library

    'Microsoft Project 15.0 Object Library

    'Visual Basic For Applications

'!!!!!!!!!!!!!!!!!!!!!!!!!!!!!!!!!!!!!!!!!!!!!!!!!!!!!!!!!!!!!!!!!!!!!!!!!!!!!!!!!!!!!!!!!!!!!!!!!!


Public mFrm As Object

Public WithEvents mLst As MSForms.ListBox

Public WithEvents mBtn As MSForms.CommandButton

Public mLbl As MSForms.Label

Public oCls As Object

Private vbCom As String

Public tSel As Task


Private Sub Class_Initialize()

   Set oCls = CreateObject("Scripting.dictionary")

End Sub


Public Function fnFrmVal()


fnNewUsf "Relationship", 328, 372

fnNewLst "lstPred", 24, 6, 115, 350

fnNewLst "lstSucc", 163, 6, 115, 350

fnNewBtn "bCls", 18, 72, 282, 278

fnNewLbl "lblPred", "Predecessor", 12, 90, 0, 6, 1

fnNewLbl "lbl1", "ID", 12, 30, 12, 6, 2

fnNewLbl "lbl2", "Name", 12, 96, 12, 42, 2

fnNewLbl "lbl3", "Type", 12, 30, 12, 288, 2

fnNewLbl "lbl4", "Lag", 12, 24, 12, 324, 1

fnNewLbl "lblSucc", "Successor", 12, 90, 138, 6, 1

fnNewLbl "lbl5", "ID", 12, 30, 150, 6, 2

fnNewLbl "lbl6", "Name", 12, 96, 150, 42, 2

fnNewLbl "lbl7", "Type", 12, 30, 150, 288, 2

fnNewLbl "lbl8", "Lag", 12, 24, 150, 324, 1

fnNewLbl "lbl9", "Select Task then Double Click to GoTo…", 12, 162, 282, 36, 1

Call UForm_Initialize

mFrm.Show

End Function


Function fnNewUsf(ByVal frName As String, ByVal mH As Long, ByVal mW As Long)


Set mFrm = ThisProject.VBProject.VBComponents.Add(3)

vbCom = mFrm.Name

VBA.UserForms.Add (vbCom)

Set mFrm = UserForms(UserForms.Count - 1)

With mFrm

    .Caption = frName

    .Height = mH

    .Width = mW

End With

End Function


Function fnNewLst(ByVal lstN As String, ByVal mT As Double, ByVal mL As Double, ByVal mH As Double, ByVal mW As Double)


Dim o

Set o = mFrm.Controls.Add("forms.ListBox.1")

If o = True Then Exit Function

Dim c As New clsFrm

Set c.mFrm = mFrm

Set c.mLst = o

With c.mLst

    .Name = lstN

    .Top = mT

    .Left = mL

    .Height = mH

    .Width = mW

    .ColumnCount = 4

    .BoundColumn = 1

    .ColumnWidths = "30 pt;255 pt;20 pt;40 pt"

    .ColumnHeads = False

End With

oCls.Add lstN, c

Set c = Nothing

End Function


Function fnNewBtn(ByVal fName As String, ByVal mH As Double, ByVal mW As Double, ByVal mL As Double, ByVal mT As Double)


Dim o

Set o = mFrm.Controls.Add("forms.CommandButton.1")

If o = True Then Exit Function

Dim c As New clsFrm

Set c.mFrm = mFrm

Set c.mBtn = o

With c.mBtn

    .Name = fName

    .Caption = "Close"

    .Top = mT

    .Left = mL

    .Height = mH

    .Width = mW

End With

oCls.Add fName, c

Set c = Nothing


End Function


Function fnNewLbl(ByVal fName As String, ByVal mCap As String, ByVal mH As Double, ByVal mW As Double, ByVal mT As Double, ByVal mL As Double, ByVal tA As Double)


Dim o

Set o = mFrm.Controls.Add("forms.Label.1")

If o = True Then Exit Function

Dim c As New clsFrm

Set c.mFrm = mFrm

Set c.mLbl = o

With c.mLbl

    .Caption = mCap

    .Top = mT

    .Left = mL

    .Height = mH

    .Width = mW

    .TextAlign = tA

End With

oCls.Add fName, c

Set c = Nothing


End Function


Private Sub mLst_dblClick(ByVal Cancel As MSForms.ReturnBoolean)

Dim e As Integer


    On Error Resume Next

    If Len(mLst.Value) > 0 Then

        EditGoTo ID:=mLst.Value

        e = Err.Number

        On Error GoTo 0

        If e = 1101 Then

            MsgBox "Selected Task is hidden...please Un-Hide or remove Filter first", vbInformation

            Exit Sub

        End If

        mFrm.lstpred.Clear

        mFrm.lstsucc.Clear

        Call UForm_Initialize

    Else

        MsgBox "Please Select Task and double click to GoTo...", vbInformation

    End If

End Sub


Private Sub mBtn_Click()

    mFrm.Hide

    Unload mFrm

End Sub


Private Sub Class_Terminate()


Dim VBComp As Object

If vbCom <> "" Then

    Set VBComp = ThisProject.VBProject.VBComponents(vbCom)

    ThisProject.VBProject.VBComponents.Remove VBComp

End If

Set oCls = Nothing

End Sub


Function fnTaskL(ByVal sTask As String, ByVal sLink As String, oList As ListBox)

Dim i           As Long

Dim sTemp       As String

Dim sTable      As Variant

Dim cTable      As String

Dim y           As Integer

Dim lText       As String

Dim vText       As Variant

Dim l           As Long

Dim x           As Long


sTemp = ""

x = 0

sTable = Split(sLink, Chr(44))

For i = LBound(sTable) To UBound(sTable)

    cTable = sTable(i)

    For y = 1 To Len(cTable)

        If (Mid(cTable, y, 1) = "F" Or Mid(cTable, y, 1) = "S") And (Mid(cTable, y + 1, 1) = "F" Or Mid(cTable, y + 1, 1) = "S") Then

            lText = CStr(sTemp)

            lText = lText & Chr(44)

            sTemp = Mid(cTable, y, 1)

        ElseIf (Mid(cTable, y, 1) = "+" Or Mid(cTable, y, 1) = "-") Then

            lText = lText & CStr(sTemp)

            lText = lText & Chr(44)

            sTemp = Mid(cTable, y, 1)

        Else

            sTemp = sTemp & Mid(cTable, y, 1)

        End If

    Next y

    If sTemp <> "" Then

        lText = lText & CStr(sTemp)

    End If

    vText = Split(lText, Chr(44))

    oList.AddItem

    l = UBound(vText)

    With oList

        .List(x, 0) = vText(0)

        .List(x, 1) = fnGetN(vText(0))

        If l > 0 Then

            .List(x, 2) = vText(1)

        Else

            .List(x, 2) = "FS"

        End If

        If l > 1 Then

            .List(x, 3) = vText(2)

        Else

            .List(x, 3) = "0"

        End If

    End With

    x = x + 1

    sTemp = ""

    lText = ""

Next i

End Function


Function fnGetN(ByVal sT As String) As String

Dim o As Object

Dim t As Task

Dim s As String


Set o = ActiveProject


For Each t In o.Tasks

    s = CallByName(t, "ID", VbGet)

    If s = sT Then

        fnGetN = CallByName(t, "Name", VbGet)

        Exit Function

    End If

Next

End Function


Private Sub UForm_Initialize()

Dim tS As String

Dim tP As String

Dim vP As Variant

Dim vS As Variant

Dim t As String

Dim oT As ListBox

Dim i As Long

Set tSel = ActiveCell.Task


On Error GoTo ErrorHandle

t = tSel.ID

tP = CallByName(tSel, "Predecessors", VbGet)

Set oT = mFrm.lstpred

Call fnTaskL(t, tP, oT)

tS = CallByName(tSel, "Successors", VbGet)

Set oT = mFrm.lstsucc

Call fnTaskL(t, tS, oT)


Exit Sub

ErrorHandle:

MsgBox Err.Description

End Sub


'End of clsFrm VBA Code

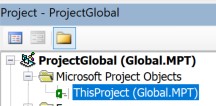
 8. Select ThisProject (Global.MPT) and double click 

Global-Properties

9. Copy and Paste below code on the blank Global.MPT code window


'Start copy from line below

Option Explicit

Sub Auto_Open()

    Dim ContextMenu As CommandBar


    ' If context menu has been created before, let's delete it to avoid duplicates.

    Call DeleteItemContextMenu


    ' Set ContextMenu variable for the cell context menu.

    Set ContextMenu = Application.CommandBars("Tools")

    With ContextMenu.Controls.Add(Type:=msoControlButton, before:=1)

     .OnAction = "sFrmRel"

     .FaceId = 190

     .Caption = "RELATIONSHIP"

     .Tag = "New_Item_Context_Menu"

    End With

End Sub


Sub DeleteItemContextMenu()

    Dim ContextMenu As CommandBar

    Dim ctrl As CommandBarControl

    Dim x As Integer

    ' Set ContextMenu for cell context menu.

    Set ContextMenu = Application.CommandBars("Tools")

    ' Delete the custom controls with the Tag : New_Item_Context_Menu.

    For Each ctrl In ContextMenu.Controls

       'Debug.Print ctrl.Caption

        If ctrl.Tag = "New_Item_Context_Menu" Then

            ctrl.Delete

        End If

    Next ctrl


End Sub


Sub sFrmRel()

Dim MyForm As New clsFrm

MyForm.fnFrmVal

Set MyForm = Nothing

End Sub


'End of Global.MPT VBA code

 10. Save and Close Visual Basic window.Every time user opens a MS Project MPP, a Add-ins ribbon will added to the menu as shown below.

Add-In-Menu

Enjoy!!! If you have any issues, please let me know.

Cheers

Rafael Davila
User offline. Last seen 1 week 6 days ago. Offline
Joined: 1 Mar 2004
Posts: 5241

The “Too Late Is Possible” constraint in Microsoft Project - Primaned Academy

  • In P6 the “As Late As Possible” constraint will use the free float. In MSP this same constraint will use the total float (P6 Float = Slack in MSP).
  • Unless you want to make all tasks critical, you can better not use the “As Late As Possible” constraint in MSP. There is no good way to have activities as late as possible before another activity (For example, you don’t want to have the activity delivery a lot of days before the activity production will start). You can only manually add a “ Start No Earlier Than” on the delivery activity however this will make the planning undynamic.
Tom Boyle
User offline. Last seen 10 weeks 6 days ago. Offline
Joined: 28 Nov 2006
Posts: 304
Groups: None

[Duplicate - remove.]

Tom Boyle
User offline. Last seen 10 weeks 6 days ago. Offline
Joined: 28 Nov 2006
Posts: 304
Groups: None

UK Planning,

  1. The task path bar styles are the primary built-in method for tracing predecessor and successor logic paths in MSP.  Even with the aid of the task-path filter macros that Rafael linked, however, they can become unwieldy in complex projects.
  2. The Predecessors list on the Task Inspector pane (“Inspect Task” on the Task ribbon) allows click-tracing (like GoTo in P6) – but only backward through driving task links.  Click tracing of successor paths and non-driving paths in either direction is not supported.
  3. The number of MSP users needing more than this is pretty low.  There are some pretty good add-ins available, but they are not free.  Here’s one that does full-scope click tracing using a “jump” button (throwback to P3):  https://boyleprojectconsulting.com/tomsblog/2017/06/30/inspecting-task-links-with-bpc-logic-filter-for-microsoft-project/   [See also Video – Inspect and Jump through Network Logic Links Using BPC Logic Filter – LLI Edition].

ALAP constraints in MSP are fundamentally different from the same-named constraints in P6.  Avoid them in forward-scheduled projects.  If you want to remove float from a chain of activities, then using a "SNET" constraint at the front of the chain will be simpler in the long run.   Good luck, tom

Rafael Davila
User offline. Last seen 1 week 6 days ago. Offline
Joined: 1 Mar 2004
Posts: 5241
Rodel Marasigan
User offline. Last seen 4 days 10 hours ago. Offline
Joined: 25 Oct 2006
Posts: 1699

Hi,

1) On the menu click View and tick Detail. It will show you a detail window at the bottom and make sure that the Task Form was selected on the drop down. Right click on the detail window and select Predessesor and successor. From there you can see the relationship of each task selected then you can use Ctrl + G funtion to go to task shown on the predessesor or successor window. It similar but not the 100% the same.

2) On the Milestone Task, double click and a Task information window will popup. Select Advance tab and select the contraint Type and Constraint Date. Alternatively, right click the column headers and select insert column and press "c" and select Contraint Type then do the same for Constrain Date.