
Primavera Tips and Tricks
Tracing logic to a targeted activity using Primavera P6
Project Controls – Planning and Scheduling
July 2018 By David H. Doughty, PSP
Introduction:
In this post, I will show you how trace logic to a targeted activity on your project by utilizing Multiple Float Path functionality in Primavera P6.
This will allow you to focus on the work that is leading up to the targeted activity, which may not be on the project’s critical path. Let’s say you have a major Stakeholder on your project that has a Grand Opening Planned for a new store that is depending your work in the area being completed. The Grand Opening is a major event and not something you want to slip. The traditional Longest Path and Multiple Float Path Gantt Charts are not useful as they focus on project completion and not this targeted activity.
If you follow the procedure outlined in this post, you will have a Multiple Float Path chart that focuses on the targeted activity.
Observation:
You need to analyze logic to a targeted activity in your schedule. As this activity is not on the critical path, the traditional Longest Path and Multiple Float Path Gantt charts will not do the trick.
Causation:
Traditional Longest Path and Multiple Float Path Gantt charts base everything on the Float Paths through project completion. When you need to trace Float Paths to anything other than that, those charts are not useful.
Solution:
This 6 Step process will allow the Primavera user to create a Gantt chart that displays the first 3 Float Paths to the targeted activity.
Step 1: Bring up the Schedule Dialog Box in Primavera.
Whether you use the text menu - <Tools> <Schedule>, the scheduling Icon , or F9 ------ you need to open the Schedule Dialog Box.
This will allow you to select the Options button in the dialog box.
Step 2: Select the Advanced tab.
This will open the Advanced tab for you to configure
Step 3: Configure Multiple Float Paths.
The graphic below looks a little busy, but is very straight forward.
A. Select the Calculate Multiple Float Path check box, telling P6 to calculate the Float Paths.
B. Select the Free Float Radio button and NOT the Total Float. (this relates to longest path)
C. Now select the Activity to which to run the Float Paths. A new dialog box will assist you in selecting an activity. Leaving this blank will tell Primavera to use project completion as that end.
D. The last option is how many Float Paths you want to run. In this example we are using 3 for brevity. I generally use 10.

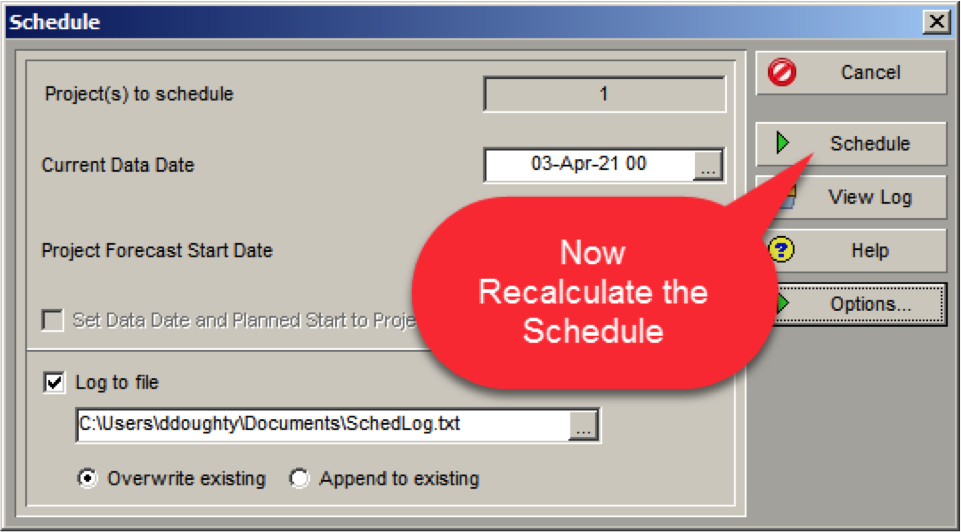
Step 4: Recalculate the schedule.
Primavera will automatically calculate the Float Paths to your selected Activity. This calculates in the background and gives you no indication it has been done.
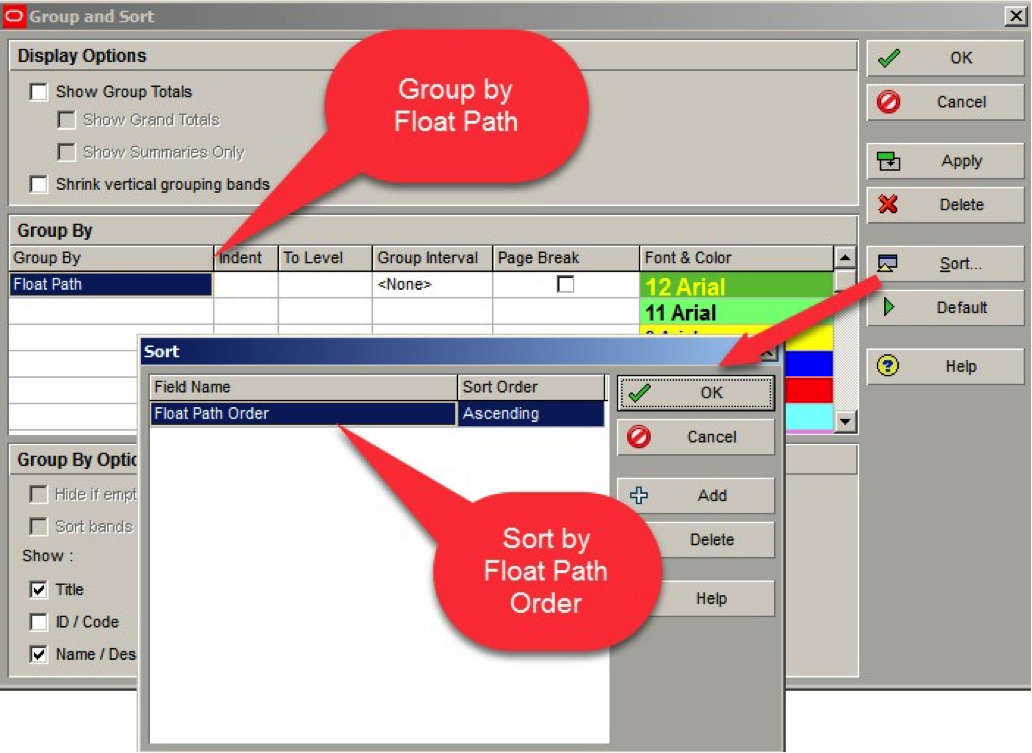
Step 5: Set the Grouping and Sorting options.
Before you generate the Gantt chart – set these options in the Group and Sort Dialog box.
A. Group by Float Path.
B. Sort by Float Path Order – Ascending.
Step 6: Select your columns and paper size.
Everyone will have their own preferences, but in this example, we have columns for:
- Activity ID
- Activity Name
- Remaining Duration
- Start
- Finish
- Total Float
- Calendar
The paper size is 11 x 17.
It is not uncommon to find abbreviated float paths in a CPM schedule. They are generally the result of bifurcated logic (multiple predecessors and/or multiple successors). Analysis should generally be focused on the more robust paths. Float path #1 should generally run the length of the project, barring the use of constraints on the critical path.

Summary:
This process will yield the first 3 Float Paths to the targeted activity, in order of criticality based on that activity. Do not be concerned if the Total Float value does not decrease in subsequent Float Paths as it is based on Project Total Float and the assigned activity calendars.